Tufts Robotics Club
In the beginning of my freshman year at Tufts, I joined the Tufts Robotics Club. My senior year, I was one of the Co-Presidents for the club. My junior year, I was elected to the club's executive board as their secretary. The projects I have completed with them are building an underwater ROV and two BattleBots, based on the popular show.
Senior Year - Co-Presidential Work
-
As Co-President of the Robotics Club, I led project teams, taught workshops, ran general meetings, and held office hours.
-
I ran executive board meetings handling a budget of $30,000.
-
I grew the club from 60 to 100 members.
Senior Year - Underwater ROV
During my senior year, I co-led a team which built a SeaPerch underwater ROV.


Junior Year - BattleBot
I was put in a group of four. The bot had to weigh less than 5 lbs.
This time, we decided on a flipper. We ordered a spatula to put on the front for flipping. This year I was the most experienced member on my team, and I oversaw all of the construction of the bot, as well as programming it in its entirety and doing the majority of the electrical wiring.
Freshman Year - BattleBot
I was put in a group of four, with three of us being freshman with little to no robotics experience. We had a constraint of $200 for materials and the bot had to weigh less than 3 lbs.
Brainstorming
We began by brainstorming what features we wanted our BattleBot to have. We decided:
-
The BattleBot should have a spinning blade on the front for our weapon.
-
Our BattleBot should be reversible. We knew that some BattleBots would try to flip their opponent, and we wanted to be able to survive that.
-
It would be controlled with a Raspberry Pi and video game controller.

CADing and Design
I was the main person in charge of CADing the acrylic casing for the BattleBot. I had never done any CADing before, so I learned from a combination of help from other club members, research, and trial-and-error.

The picture on the left shows the CAD design made for the top of the bot. The initial designs were done in OnShape, but later iterations were done in SolidWorks. Some key components I had to consider while CADing were:
-
Height: The bot had to be tall enough for it to fit all of the internal components, but it could not be too big, because of the weight restriction, and because the wheels had to be able to poke out of both the top and bottom for the bot to be reversible.
-
Slots: I made slots on the sides of the design, so that the sides, top, and bottom could fit together easily.
-
Holes: I added small screw holes for mounting internal components, holes for the wheels, and a hole for the weapon mount.
Materials
Once we had a general idea of the BattleBot, we began researching what materials we would be including on it. Our main concerns while researching components were:
-
Function: We checked the specifications of the component to ensure that it was capable of doing its job.
-
Durability: Everything that we put on the bot had to be able to withstand a fight, so we had to pick things that were durable enough not to break during this.
-
Size and Weight: Due to the weight restriction and the height of the wheels, everything was limited to being a small size and weight.
-
Cost: Due to the $200 spending limit, everything had to be inexpensive.


The images above are examples of some of the components we researched and bought. The bottom left picture is of the motor we used for the weapon. It is a motor meant for heavy-weight drones. We picked it because it was able to rotate at extremely fast speeds, but it also had a large torque due to it being meant for heavier drones.
Building
I began by laser cutting a chipboard prototype of the casing to ensure that the measurements were correct and the sides fit perfectly with the top and bottom.

Once we knew that our CAD model was correct, I laser-cut the case in acrylic and we mounted all the components inside, connected the wires, and did some soldering.
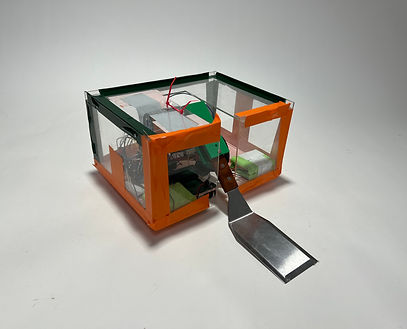
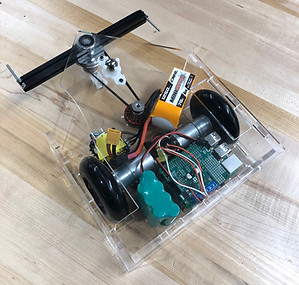
Our assembled BattleBot is in the picture on the right. Some key components of our assembly:
-
We put the drone motor close to the middle of the casing. This was because we didn't want it to get hit by anything and break. We attached a belt from the motor to the weapon.
-
We wanted to make a real blade at the end, but unfortunately we didn't have access to the proper materials. Instead, we took a piece of scrap metal and attached screws to the ends.
-
The two wheels on either side poked out on the top as well as the bottom, fulfilling our goal to be flippable. There is also a ball castor on the top and bottom at the front.
-
There was a Raspberry Pi onboard for control, as well as servos and batteries.
Testing
We tested each component of the BattleBot on their own and as a part of the bot. Iterative testing was very important, because it was difficult to take everything apart if something went wrong.
To the right is a video example of one of our final tests: testing the weapon. We dropped a 3D printed piece onto it to test its strength and we were not disappointed by the result.
Battle!
The day came for the battle. Opponents were decided randomly the day-of. Unfortunately, we were paired with a BattleBot that was entirely defensive, with a metal shield surrounding its entirety.
In an ultimate display of an unstoppable force versus an immovable object, we unfortunately lost due to our weapon being disabled by their shield. The motor and weapon itself had held up during the fight, but the belt connecting the two had come loose, making it impossible to spin the weapon.
Reflection
The main thing I learned from the fight was that it is important to be prepared for many possibilities. We were expecting to be put against a normal BattleBot with an offensive weapon. If we had put less attention on the blade and looked into other possibilities in addition, we may have had a more successful BattleBot.
This project demonstrates that I am a fast and eager learner. I began the competition with no CAD, laser-cutting, or robotics experience, and I acquired many new skills in the short amount of time before the competition. I also work well in a team. In this project, the three of us with no experience learned with and from each other and ended up with a functional bot. Despite our loss, I am proud of the result.